


Halloween usually means an overload of candy here at the HQ of Jump Fitness, but we all know that we also need some healthy snacks to helpkeep that energy up, especially after a long bounce on the trampoline! Here are three of our favourite creepy snacks that we like to make during Halloween. They are all nut-free recipes, because that’s how we roll here due to our allergies.
(1) Scary Hummus and Vegetable Dip
Here in the UAE, delicious hummus is available to buy from almost all grocery stores and that will work perfectly well here. However, if like us, you want to make it at home then here is how we whip up a batch:
Here’s what you will need: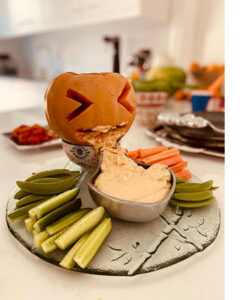
- 1 (400g) tin of chickpeas – strain but keep liquid
- 1 Table spoon of lemon juice
- 1 Table spoon of olive oil
- 1 clove of garlic crushed
- ½ teaspoon salt
- 2 drops of sesame oil to taste
- Food processor
Directions:
Blend chickpeas beans, lemon juice, olive oil, garlic, cumin, salt, and sesame oil in a food processor; stream reserved chickpea liquid into the mixture as it blends until desired consistency is achieved.
Serve with chopped up vegetables, we like chopped red pepper (capsicum), cucumber, carrots and snow peas. To make this seriously spooky we carve up a mini pumpkin and arrange it in the most disgusting vomiting manner.
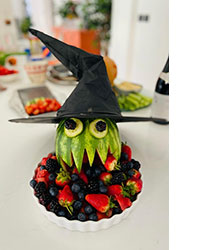
(2) Witches Berry Platter
Watermelons are relatively easy to get hold of here in the UAE and are perfect as an easy alternative to carving a pumpkin. The added bonus? They make a super delicious and nutritious snack (full of vitamin A, C and B6). Just remember that it’s still hot outside in October and so a watermelon or any fruit will not last long outside the fridge – so no leaving this one on your doorstep!
Here’s what you will need:
- 1 x watermelon (oval or round and ideally seedless, but one with seeds will also work)
- 2 x Cucumber slices and blackberries (for the eyes – other fruit or candy works well here)
- A selection of other berries to serve (we used strawberries, blackberries and blueberries)
- Cutting board
- Kitchen knife
- Small bowl
- Dry erase marker
- Paring knife
- Melon baller, fluted or regular
- Pins or toothpicks/skewers
- Battery-operated candle or light (optional)
TIP: How to choose a good watermelon for carving:
Look for a round or oval shaped watermelon that is free from bruises, cuts or dents.
The watermelon should be heavy for its size. On average, a 2kg watermelon yields approximately 11 cups of edible fruit.
The underside of the watermelon should have a creamy yellow spot from where it sat on the ground and ripened in the sun.
TIP: How to carve a watermelon:
Cuts are easiest when the watermelon is at room temperature. Once your work is complete, pop the carving and contents back in the fridge to chill before serving.
A sharp knife with a pointed tip makes the easiest, cleanest cuts.
Remove excess flesh in large pieces, when possible, to allow for easier melon ball or cube creation.
Directions:
Wash watermelon under cool running water and pat dry.
On cutting board, place watermelon on its side and use kitchen knife to cut off 1/2cm or 1cm from bottom (end opposite stem), being careful not to cut too deep into white part of rind. This creates a flat bottom for your design to sit on.
Cut 1 or 2cm from stem end to create large opening at the top, enough to fit your hand in to get the melon out
Using dry erase marker, draw zig-zag lines to create a mouth. Use paring knife to cut out the design, being sure to cut through to red fruit.
Use a melon baller to hollow out inside of watermelon. Use scoop to remove excess watermelon. If you don’t have a baller or scoop then a knife does this job too, its just a bit more tricky.
Using the cucumber slices and blackberries create eyes and fix them to the watermelon with the skewer, toothpick or pins.
Arrange the melon and berries on a platter with the carved watermelon in the middle.
Put battery-operated candle or light into the carving to create an extra spooky glow.
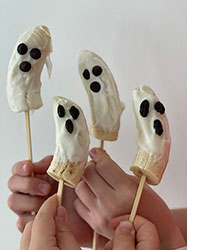
(3) Frozen Ghost Pops
These ghostly treats work well as a dessert or as a healthy snack. Just remember to take out of the freezer just before serving so they do not melt before your guests get to enjoy.
Here’s what you will need:
- 2 bananas
- Greek yogurt (any thick yogurt will do the job here)
- Box of raisins or chocolate chips
- Popsicle sticks or skewers
- Parchment paper and baking tray
Directions:
Cut bananas in half and insert Popsicle stick or skewer halfway through each piece.
Dip bananas in yogurt and place on parchment paper, on a baking tray.
Push raisins or chocolate chips onto banana in a face pattern. We like to do this before the bananas go into the freezer, but it can be done afterwards as well.
Place in freezer until frozen.
Once frozen, enjoy as a dessert or as a healthy, spooky snack.